

This outlines the initial steps we’ll take to set up the construction drawing for the assignment, “Foreshortened Self Portrait”.

Step 001. We begin with collaboration. Working in pairs, we’ll experiment with using a fish eye lens to create a self portrait with exaggerated foreshortening. To heighten the effect, students will reach out until they are nearly touching the lens. Perhaps they might consider holding something personally meaningful in their hands to make the image more about THEM.
Step 001, the reference photo, will take place in class, while we are finishing the final stages of the “Drawing the Eye” and “Drawing the Face” exercises.

Step 002. I already have a grid created in the computer. Once students have selected an image to use for reference, we’ll lay that grid on top of their photo for them. (This assignment does not assess the purpose of the grid because they would have learned this in the prerequisite Art I course; it does reinforce prior learning however.)
When students come to class on the first day of this assignment, I will already have this prepared for them. Many students will reference the gridded image of themselves directly from the computer screen since I archive them on Flickr. Others have the option to print a copy for themselves.

Step 003. Because students will be working with charcoal, let’s make things easier to reference the values: We’ll convert the photo reference to grayscale (with an option to then print it out to fit on an 8.5 x 11 inch page or leave it on the screen. On the screen, the image is higher quality so that students can more readily see the shifts in tonality.) Optionally, we wouldn’t need to print this out at all – I can email or DropBox the image to kids and they can see it in very great detail on their MacBook Air.
When kids come to class on the first day of this assignment, I will already have this prepared in advance having made the images previously.

Step 004. On a clean sheet of 18 x 24 inch drawing paper (We’ll use Canson paper), mark off the top and side edges every two inches. Use a t-square and triangle to LIGHTLY add a graphite grid to the drawing paper. It’s very important to make ACCURATE measurements, and very important to keep all pencil lines LIGHT!
Students will complete this stage on the first day of the assignment. Many students will take approximately thirty to forty minutes to complete this stage.

Step 005. Referring to the gridded photograph, carefully draw the contour lines as ACCURATELY and as LIGHTLY as possible using vine charcoal. (Again, kids would have learned how to enlarge using a grid in Art I, so this is NOT a lesson in learning to use the grid. We will refresh the basics in class however.)
It is likely kids begin this stage on the first day of the assignment. Most students take one to two classes to complete the contour drawing (ninety minutes to three hours.) Once the contour drawing is complete, they will be ready to begin working with vine charcoal to block in value. Kids will have three class periods to complete that stage.
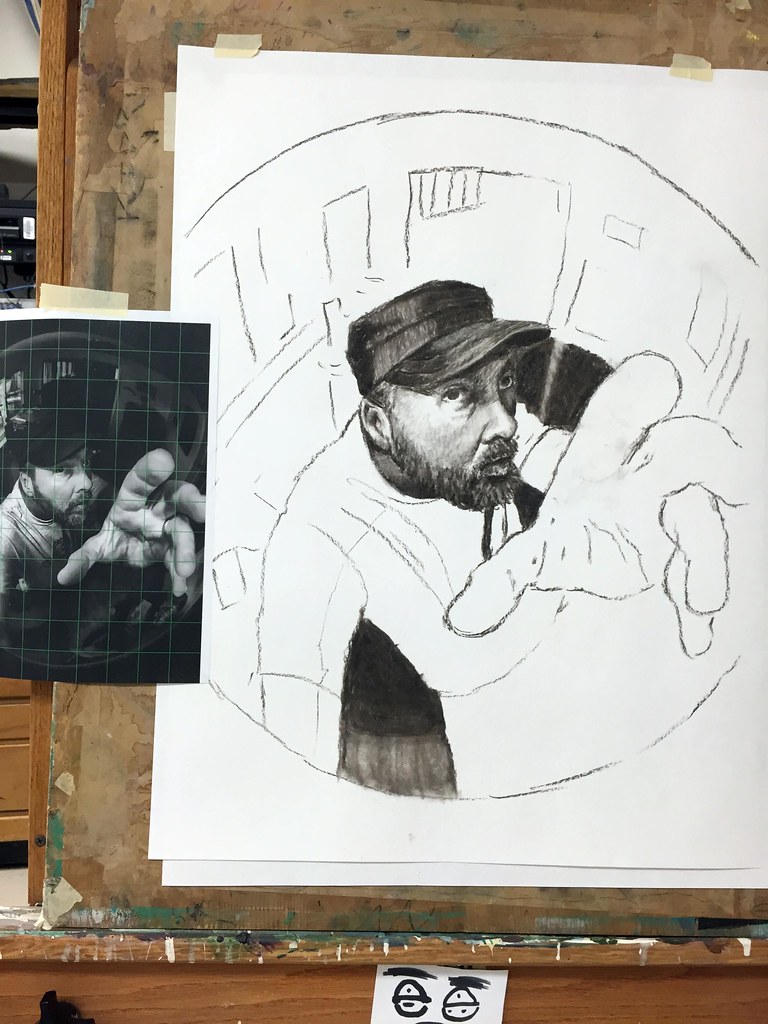
Step 006. I neglected to make a photo of the basic gesture by itself, but this image shows some of the gesture still in place – simple, light lines that define the accurate placement and size relationship of important aspects. You can also see the values beginning to get blocked in with vine charcoal. These are still rough and I recommend photographing each stage of the work to self critique. For whatever reason, I find it easier to see problems in a photograph…perhaps the camera magnifies issues? Maybe it’s simply providing unrestricted focus – I don’t know, but I do know that it helps me to look more deeply at my composition and application of media. In this instance, I notice that the blocking in of the hat leaves it feeling flat rather than representing form in the round. I’ll fix that during this morning’s studio session with the Drawing class.
Another thing to remember is that I don’t particularly care for vine charcoal. My technique is to apply, blend, erase, repeat: it’s a seesaw for me, moving back and forth between two extremes of “too light” and “too dark” as I build up layers of blended charcoal, a sort of push/pull if you will.
Also, if I use a grid, instead of erasing the grid lines after I’ve placed the gesture drawing I may simply trace those lines onto a top sheet, starting the finished drawing on a fresh sheet of paper. This leaves the original foundation drawing handy in case I screw something up.
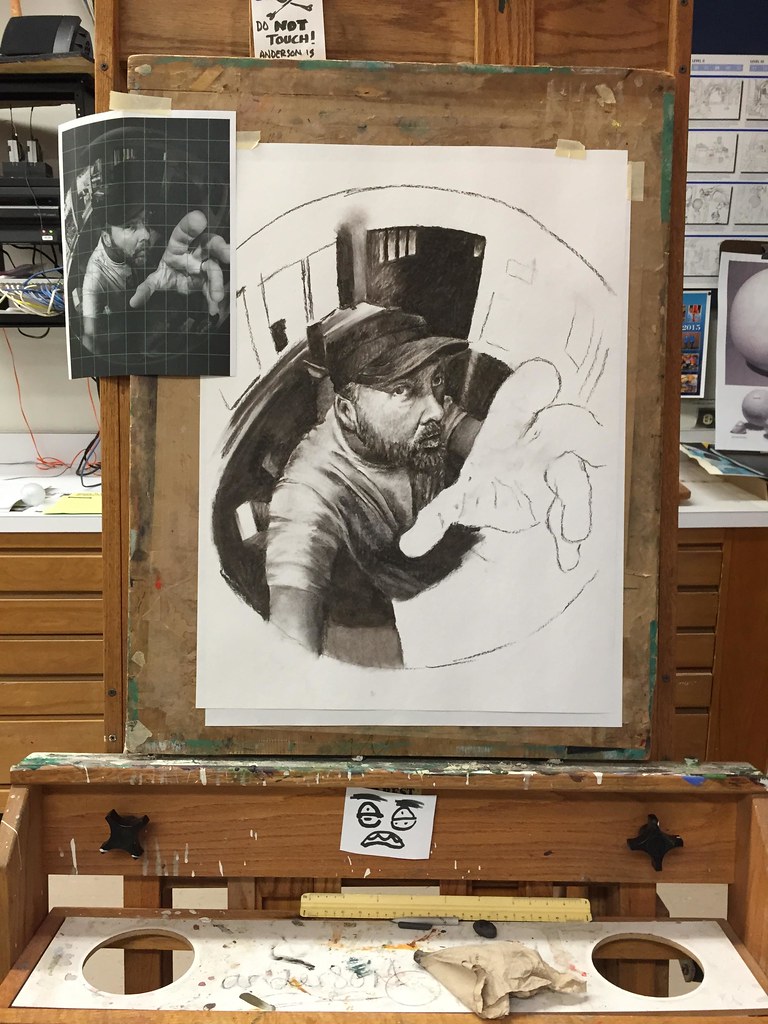
I recommend working in “rounds” – begin at the focal point and draw toward an edge. Return to the focal point, and then draw outward toward another edge. This helps to keep the point of emphasis in focus, with the majority of important detail in that spot. It also helps to keep the overall drawing in context rather than appearing to be postage stamped together, with some areas feeling like they were overworked and other areas overlooked – a big problem with student drawings, quite frankly.

Corrections in vine charcoal are easy to make: simply wipe off the marks with a chamois or crumpled paper towel. Frankly, the crumpled paper towel works as well for me to wipe or blend as does a chamois or blending stub…and it’s much cheaper than a chamois! A kneaded eraser can be used like a pencil to “draw” out or “lift” tone from the paper.

Click here to see student work in progress
Assessment
Understands and applies media, techniques, and processes: Effectively uses a variety of subject matter, tools, media, and techniques to visually communicate ideas in artworks
Use of Gesture.
- Creates drawing, working from the general to the specific, capturing the gesture before working in details.
- The gesture is not an outline, but multiple soft strokes that indicate the contour.
- The gesture has no detail and should be easy to correct (light lines)
- The gesture should accurately indicate size and placement and angle.
Facial Proportions.
- Features include important identifying details that are accurate for size, shape, and position.
- Features represent accurate relationships among all the parts; no proportional inconsistencies exist between features.
- Features show no apparent distortions except those that indicate foreshortening.
- Foreshortening is accurate and consistent.
Value and Blending.
- Dark outlines do not exist. Lost and found lines may be apparent.
- Contrasts in value separate features and objects visually.
- The entire value range is evident (nine levels of light and dark); values changes blend smoothly and naturally.
- Areas having similar value contain subtle variations used to describe structure, texture, and detail.
Engages in behaviors that promote learning: Demonstrates proficiency and craftsmanship; actively engages in all learning activities; contributes to a positive learning environment; utilizes problem-solving strategies; and follows art room expectations and procedures
- Behaviors are consistent on a daily basis; learner has the discipline to focus on the performance assessment from the beginning stages all the way through the end product.

That is just so cool! Thanks!